"Tree of Life," 96" x 90", handmade by Pam Geisel, July 2017. Two-sided art quilt for a bed, "Fall/Winter" is shown on the bed.
Yes, it's been over a month since my last post, but here's a long one with a lot of photos to make up for it. I spent the last several weeks working on a custom, two-sided art quilt for the bed.
"Spring/Summer" and "Fall/Winter"
Day 1 : The design has been approved. I created it using the computer program
InDesign so now I print it out. I have to print it tiled onto 30 pages, trim
the edges, then tape it together.
Day 2 : Went through my stash and
selected the fabrics to use for the sky
background. If you asked me yesterday about my fabric stash, I would have told
you that I had a lot of blue but not a lot of purple. Today it is obvious that
when it comes to lighter shades that I have a lot more light purple than I do
light blue (although I won’t when I’m done with this quilt!) I used commercial
cottons, hand dyes, and batiks including some of the Island Batiks. I used
almost most of the yard of light purple from the Sweet Pea collection.
I cut the fabric
, 44 squares that are 10.5”x10.5 and 20 pieces that are 10.5”x5.5” and I arranged them from light to dark and
getting slightly darker on the ends of the rows. I had to set up two six foot
folding tables in my annex room to lay it out on. Sometimes I am surprised at how long it can
take just to select and cut the fabrics for a quilt.
Day 3 : Sewed the sky background fabric into rows then sewed them together. I
planned it so the rows are off-set instead of making a checkerboard pattern to
avoid the seam bulk and to make it seem more random. Lots of walking back and
forth from the layout tables in the annex room to the sewing table. It took less
time to sew them than it did to cut them. The green fabric on the right is the border fabric, so all other fabirc has to complement it.
Day 4 : Cut the pieces for the green grass and purple mountains under the tree. Fuse them to
a piece of fusible innerfacing that is on top of my printed paper. Top stitch
the raw edges in place. Again the cutting and placing took longer than the
sewing.
Day 5 : I traced and cut the templates for the different parts of the tree,
then I used these to cut out the tree pieces. Since this will be a two-sided
quilt and I designed it so the tree and background are reversed on the back
side, I was able to cut the pieces for both sides the same way that sewers cut
fabric for clothing by folding the fabric in two and cutting through two
layers. This way one piece is right side up (for the top) and the other is
reversed (of course it doesn’t matter with batik fabrics since both sides are
the same).
The customer wanted a heart with initials “carved” on the tree. I
don’t have a sewing machine that does embroidery (as I don’t do embroidery) but
I choose a simple font and figured I’d just do a straight stitch over the heart
and initial going over each line three times. I thought this would be easier to
do on the single piece of fabric instead of after it’s put together.
Day 6 : I ironed Misty Fuse on the back of all the tree pieces and fused them
to the background, being sure to overlap the pieces a little bit. Then I did a
top stitch around all of the tree pieces to attach them to the background
permanently.
Sometimes I wait and do this during the quilting process but since
this piece will be two sided (and despite my best efforts there is no way I can
get the trees to line up in the same place on the front and the back) and since
it is pretty large, I’ve decided to sew down all my raw edges before quilting.
As much as I like working with fusibles, I haven’t found any yet that are truly
permanent.
Day 7 : I cut out a leaf shape from cardboard then used it to trace the leaf
shape on to the back of my leaf fabrics. Again I fused Misty Fuse to the backs
side of the fabrics then cut the pieces out. I had planned on using scissors
but realized it would be quicker with the rotary cutter and because the leaves
were a simple shape, this was possible to do with the rotary cutter.
I used
green fabrics for the Spring/Summer side and oranges, yellows, and browns for
the Fall/Winter. Some of the leaves that look brown from afar are actually
yellow with purple and orange with purple.
Day 8 : I sewed the raw edges down on the 113 leaves, using thread as close to
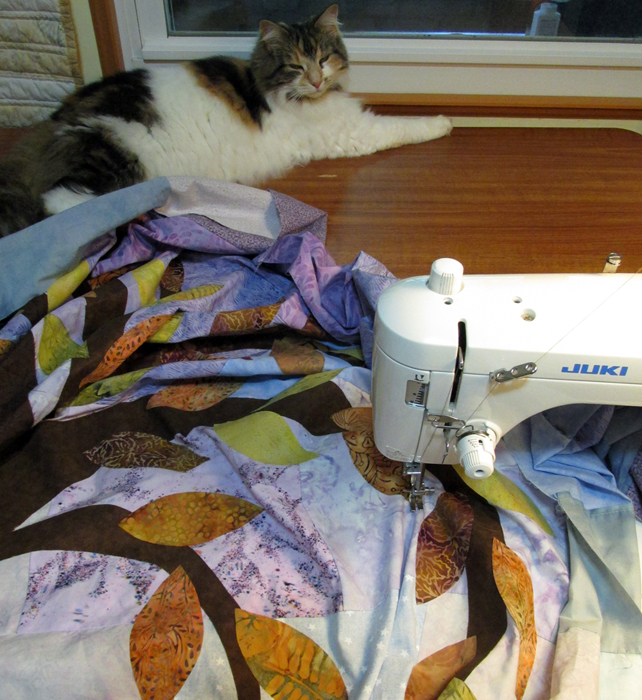
the fabric color as possible. I also had a surprise visit from quality control who supervised today's sewing.
Day 9 : Traced the 90 letters (in reverse) on WonderUnder (fusible that has
paper on one side for tracing). I fused the traced letters to the fabric, cut
out the letters, removed the backing paper, arranged the letters on backing
using a full-sized printed version for spacing, the fused them down.
Days 10 & 11 : I sewed down the raw edges on the letters. I used my regular foot for
the straight letters (like the ‘l’ and ‘w’) and my free motion foot for the
round letters so I wouldn’t have to move the fabric as much.
Day 12 : I created, fused, then sewed down the four swallows. Often the eyes are
the hardest part, because they are so small. I found a fabric that had a dark
blue dot on a cream colored background (shown in the photo) and I cut out around the dot. I cut the
pieces a little larger than I needed so part of that fabric is under the red
fabric so there are more stitches to hold it down.
Day 13 : Now that both quilt tops had all their pieces sewn down it was time to
make one of them the “back.” I placed this piece face down on my three six-foot
tables, laid the batting on top, then placed the top piece on top of the batting.
I decided the Fall/Winter side would be on top. I used pins to hold the quilt
sandwich together, which we call “pin basting.”
Day 14 : It is finally time to start quilting! Usually I don’t know how I want
to do the quilting when I start a quilt, and it’s something that I think of
while I’m putting it all together. Usually I think I’m going to do it one way
then end up changing my mind and the last minute, which is what happened this
time.
Because the fabric will move some as you quilt it, it’s a good idea to start in
the middle and quilt outwards. Since the tree is in the middle of this quilt, I
decided to quilt it first. I used Superior Thread’s Fantastico Thread #5009
that is a variegated brown and since most bark outlines on trees run
vertically, that’s the way I quilted it.
Then I
quilted lines that moved radially from the approximate center but behind the
tree. For this I used Superior Thread’s Fantastico #5156 that is variegated
green/blue/ purple.
Day 15 : More quilting. The last thing I do today is add fray check to the raw
edges to keep them from fraying. Batik fabrics are usually a made with fabric
that has a tighter weave and they don’t fray as much as quilting cottons,
although all fabrics will fray when cut along certain curves, and I have a lot
of curves in this piece. About 75% of the fabrics in this quilt are batiks, but
there are some commercial cottons.
Day 16 : And now it’s time to add the borders, but first I have to prep the
middle part. I washed the quilt on the
gentle cycle and laid it flat to dry on the two six-foot plastic tables. While
it’s drying, I machine wash and dry the fabric for the borders, then I iron and
cut them. I also wet the batting in the bathtub and machine dry it on high to
pre-shrink it as I don’t want it shrinking when it’s washed. (I did this for
the batting in the middle part of the quilt, also.)
I also set up my sewing area. I've added a 4-foot table behind the sewing table and a card table to my left to help support the quilt as I'm maneuvering it in the sewing machine. I've also added a third 6-foot table in the annex room to lay it on when I'm not working on it.
Most of the time the borders are added to the quilt top before the
quilting but I decided to use a quilt-as-you-go method to add the borders after
the middle part was quilting. The main reason was because the borders are going
to be about 20” wide so there would be a lot of extra bulk for me to quilt
around when doing all the quilting in the middle. Also because it is a
two-sided quilt and I wasn’t confident that I’d get the borders to line up when
I basted it (and the fabric sometimes moves during the quilting process) this
would allow me to make sure the borders are in the same place on the front and
back.
Day 17 : Once all the pieces are dry I add the borders by sewing a "stay stitch" approximately 1/8" around the edge to tack down the ends of the quilting thread and make sure than the edges won't be accidentally turned over when I'm attaching the border (I won't be able to see the edge since it will be under the border fabric.
Next I lay the back
border face up with the edge of the quilt on top of it and the top border face
down. I sew through all three layers with a generous 1/4“, then I abut the
border batting next to the quilt and do a zigzag stitch to hold it in place.
For additional stability, I fused some fusible innerfacing over the seams.
Because this method allows you to work in parts, I added just the top and bottom borders on and quilt today.
Day 18 : I added the side borders and quilted them.For the quilting in the borders I quilt wavy lines that start where the
lines on the middle end. I was glad I quilted the top and bottom borders before adding the side borders because it got pretty bulky after adding the sides.
Day 19 : The end is in sight! I trim off the edges of the border to make it
square then add the binding. I like to use binder clips holding it the binding in place before I sew it. Isn't that why they're called binder clips? Next I'll take photos of it to send to my client. I hope she likes it!
This is the most time I’ve spent working on a quilt. I didn’t do all of
this in consecutive days, there were some days I had other commitments and some
days where I did half of the work on one day, and the other half the next. I
can usually only average sewing about 5 hours per day because I want to stay
sharp and not make many mistakes. There were even a few days that I worked
until late in the evening, but that was not the norm.
You can click on any of the photos to see them larger.