Sunday, December 30, 2012

Custom Quilts made in 2012

Lots of pictures in this post (click on the photos to see larger views).

"Red, Red Rose," 60" x 36"; cotton, velvet, and satin fabrics.

"Grandma’s Hankies," 58" x 70"; handkerchiefs, table cloth border

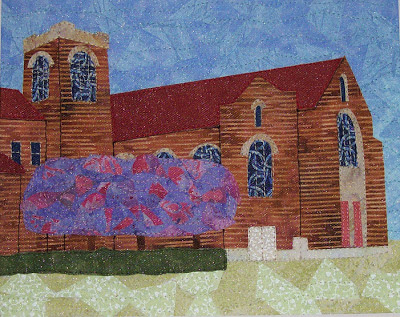
Wilmington United Methodist Church Fabric Mosaic, 11" x 14" framed

Miami Valley School Fabric Mosaics, 11" x 14" framed


Johnny B. Goode T-shirt Quilt, 48" x 80"
 
Theta Chi T-shirt Quilt, 46" x 73"
 
Heavy Metal T-shirt Quilt, 47" x 86"

Monday, December 24, 2012

Happy Holidays!

"Scrappy Christmas Pinwheel," 43" x 43", September 2012

Wishing you a holiday season that is warm and bright!

Sunday, December 9, 2012

Project Quilting Off Season Challenge: Happy Holidays


Left: Advent Calendar, 17" x 35", tree and ornaments made circa 1994, the rest made December 2012 

The new season of Project Quilting starts up again in January. To help get us ready for it, Kim of Persimon Dreams posted an off-season challenge:

Quick recap of the challenge: "Happy Holidays" 1. Select a  December or January holiday. 2. Use two different methods of quilting.

When I was a child we had an Advent Calendar. When I was first married, and before I learned to sew or quilt, my husband and I made an Advent Calendar for ourselves based on the one I had as a child. 

I still love the felt ornaments that we made but I thought the burlap background was a little saggy and now that I was a quilter, I really wanted to make it into a quilted piece.

Left: Advent Calendar before

First I removed the felt tree from burlap background because I didn’t want to hand sew the snaps on again.

Then I removed the silver sequin "tinsel" on the tree. I'd forgotten that the tree was made of two pieces of felt, split along the tinsel line.

Next I pinned the tree to the new background then couched some funky thread on the tree. I picked the thread because I liked the variegated colors and I thought the loops resembled Christmas lights. 

I couched the thread before appliqueing the tree to the background so I could tuck the loose ends of the thread under the tree. Because the tree was made of felt and it won’t fray, I didn’t have to turn the edges under.

Detail of ornaments in the pockets

For the pockets I cut 4 strips 12.5” x 3”. I folded the strips lengthwise so they were 12.5” x 1.5”. I sewed them to a piece of 10.5” x 12.5” plain backing fabric then flipped them up so the folded line was the top of the pocket and the seam allowance was now inside the pocket. I folded the edges under and appliquéd the plain background to the new background.

Because this challenge had to include a second method of quilting, I pieced some green fabric with small black stars to the top and bottom of the background.

Detail of ornaments on the tree 

I basted the quilt top to the backing fabric and the batting. I echo quilted around the tree and quilted vertically on the calendar part to create the individual pockets. While quilting I also couched a funky green thread around the calendar part.

I finished with the same green fabric for the binding then moved the felt ornaments into their new pockets.

To see the other entries go to the Happy Holidays page.

Friday, December 7, 2012

Blue Ribbon Quilt


Blue Ribbon Quilt, 41" x 46", Nov. 2012

This quilt is made using ribbons that Hannah won at horse show competitions. She gave me over 150 ribbons but luckily I didn't have to use them all.

The most difficult part was dealing with the bulk. It was tricky arranging the ribbons temporarily to take photos to send to the client so she could approve the layout ideas.

Usually quilt tops are made by placing two pieces of fabric with the good sides together then sewing them together 1/4" from the edge. When you open them, the stitching can't be seen because the fabric folds to form a seam in the back. I didn't think the ribbons would work well being sewn together that way and folded back so once the final design was decided on, I layered the light green background fabric with some batting and the backing fabric then started attaching the ribbons to the top, so the stitching that holds down the ribbons is also the quilting.

Detail of the woven flat ribbons.

I started at the top. I wove the flat ribbons into groups that were 4 ribbons wide and 3 ribbons deep. I held them together temporarily with blue removable tape while I was sewing them down.

 Detail of the ribbons with rosettes.

Next I added the ribbons with rosettes. I started with the purple one in the top center then working on either side of that ribbon, I added the ribbons in descending order, sometimes leaving parts unsewn because the next ribbon needed to be tucked under it. I changed to my regular sewing foot instead of the walking foot normally used for quilting because the regular foot was smaller and allowed me to get closer to the rosettes. 

Once the center ribbons and the horizontal ribbons were in place I switched to my freemotion "hopping" foot which allowed me to zig in and out of the rosettes to make sure they were attached to the quilt.

The long brown and white ribbons, the medium-length green and purple ribbons, the center white ribbon, and the horizontal green ribbons were set aside until I did the ribbons with the medals.

 
Detail of the ribbons with medals.

I tried to do as much as the rosettes before I did the ribbons with the medals because I knew once I started those, the quilt would become more difficult to maneuver. Luckily these ribbons were attached going straight down. 

I sewed the one in the center to get it in the correct place then I moved to the left side and attached the three on the left, then did the long brown rosette and the green one above them. Then I did the three ribbons with medals on the right and the two rosettes above them. Then I finished adding the rest of the ones with medals.


Detail of the variegated thread.

Because of all the bright colored ribbons, I didn't want to have to change the thread color for every ribbon so I decided to use a variegated thread in rainbow colors which went from red to yellow to green to blue. Some of the rosettes were sewn with the variegated thread, while others were sewn down with a neutral thread, somewhat visible in the photo above around the white rosette.

Because of the weight of this quilt, which is 3.5 pounds, the hanging stick has two picture hangers attached to it, one one the left and one on the right side of the stick.

All photos can be viewed at a larger size by clicking on them.

Saturday, December 1, 2012

2012 Holiday Gift Galleries

There are several local galleries that have my art for sale for the holiday season.

 
Village Artisan's 
Winter Wonderland Holiday Gift Shop
Village Artisans is hosting a Winter Wonderland Holiday Gift Shop in their lobby. They are open Mon. through Thurs. from 11 am to 5 pm, Fri. and Sat. from 11 am to 6 pm, and Sun. noon to 5 pm. They will be open later the week before Christmas: Mon. Dec. 17 through Thurs. Dec. 20 they will be open until 7 pm, and Fri., Dec. 21 they will be open until 9 pm.

Village Artisans is located at  100 Corry St. in Yellow Springs, Ohio.

---


Fairborn Art Association's
Holiday Fine Art and Crafts Sale
 
The Fairborn Art Association will hold it's Holiday Fine Art and Crafts Sale on Sat. Dec. 1 from 10 am to 4 pm and Sun. Dec. 2 from 1 to 4 pm, and also Sat. Dec. 8 from 10 am to 4 pm and Sun. Dec. 9 and 12 from 1 to 4 pm.

The Fairborn Art Association Gallery is located at 221 North Central Ave., Fairborn, Ohio (located in the back of the Fairborn Senior Apartments).

---


DVAC's ARTtoBUY
Dayton Visual Arts Center is having their annual "ARTtoBUY" Holiday Gift Gallery. It is open through Dec. 29. The gallery is open Tues. through Sat. from 11 am to 6 pm with the exception of Christmas Day. There will be Artist Demonstrations for First Friday on Friday, Dec. 6 from 5 to 8 p.m.

DVAC is located at 118 N. Jefferson St., in Dayton, Ohio.

---

 
The Fine Art Center at Town & Country's
Holiday Gift Gallery
The Fine Art Center at Town & Country is having their annual Holiday Gift Gallery. They are open Mon.-Sat. from 10 am to 9 pm and Sun. from noon to 5 pm.

The Fine Art Center is located inside Town & Country, 300 E. Stroop Rd. in Kettering, Ohio.