Showing posts with label Project Quilting 2015. Show all posts

Sunday, March 22, 2015

Louie - Project Quilting

"Louie," 23" x 13", made for Project Quilting, Season 6, Challenge 6: Isn't That Charming, Mar. 2015 in Yellow Springs, Ohio

Challenge recap for  "Isn't That Charming":

This weeks we're using "Charms" which are 5" squares of fabric. If you don't have a set of charm squares in your stash, you can cut your own 5" squares from any fabric you choose.
  1. The entire right front side of your project must be constructed using charm squares. The only exception is the binding. It can be cut from yardage along with backings, linings, etc, that will not show on the right front side of your project.
  2. You must use at least 20 charm squares.
  3. The charms squares can be cut and manipulated in any way you choose.
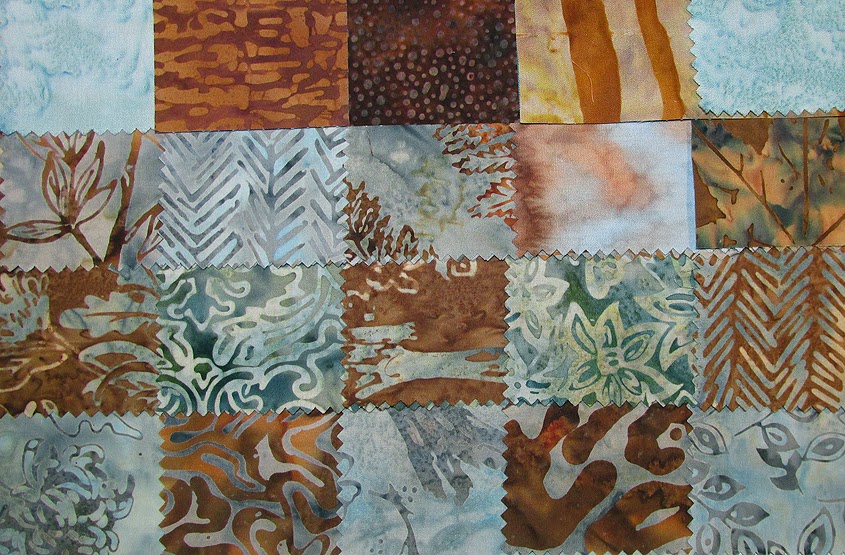
I actually have some batik charm squares. I sorted through them and found 16 that had either brown, a blue-ish gray, or both, then I cut four charms from other brown fabric that I had.


I cut 19 of the charm squares in half giving me 38 pieces cut 2.5" x 5". I arranged them, and rearranged them, then rearranged them some more until I came up with a layout that I was satisfied with. The final charm, the darkest brown, was cut into 17 smaller pieces and was inset into every other piece.


The set on the right are sewn together with a piece of yarn couched to either the right or left side of the inset piece.


Here's a close-up of the yarn, which is brown with some gold twisted in it.

Once I got it all pieced I basted it then quilt stitch-in-the-ditch. But there was something missing, so I decided to sleep on it. The next morning I decided what it needed was an owl. I'd just finished doing some graphic design for some interpretive signs for the Glen Helen Raptor Center, so perhaps I just had owls on the brain.


This is Louie, a barn owl and one of the resident raptors. I immediately noticed that the coloring in him was the same brown and grayish blue that was in the background of the quilt. I got permission to use the photo and the next step was to make an owl using fabric pieces smaller than 5" square.


TheT body is fused to the background but before fusing the head I stitched inside his head to indicate the feathers that are more obvious in his face than in the rest of his body.


I also couched some off-white hand-woven yarn around the heart shape in is face. After I added the binding, I couched the same off-white yarn around the binding edge.

More about Louie

=   =   =

Click on any of the photos to see larger images.

To read more about Project Quilting, go here.

To see other entries for this challenge, visit the Isn't That Charming link up. (Louie came in second in the People's Choice voting!) 

Sunday, March 8, 2015

Mermaid Haiku - Project Quilting

"Mermaid Haiku," 21" x 18", made for Project Quilting, Season 6, Challenge 5: My Favorite Fabric, Mar. 2015 in Yellow Springs, Ohio

Challenge recap for  "My Favorite Fabric":

Use your favorite fabric (the one that's too pretty to cut). You can add as many other fabrics as you'd like, but since this one is your favorite, it should be easily recognized in your completed project. Be sure to include a photo of the fabric.

OK, this was a tough one. Not making the quilt but picking a favorite fabric, since I have so many beautiful hand dyed and batik fabrics, in addition to commercial prints. I decided the spirit of this challenge was to use the fabric that you don't want to cut, that you just want to save forever.

I haven't had difficulty using my favorite hand dyed or batik fabrics, but when I searched through my stash (and yes, I had to look through all of it!) I did find several commercial prints that fit the category of "too pretty to cut." I noticed that most of these pieces were large scale prints, which I don't tend to use a lot.


Going by instinct, I chose this piece of fabric. It has a blue background and what looks like ocean waves, only the waves are a variegated green, pink, and purple. I couldn't decide on a way to cut it or what do do after I cut it, so I thought about what it could be if it was just the background for something else, which led to the mermaid idea.

The fabric was slightly larger than half a yard (20" x 42") and I decided to use half of it, so while I did not cut it into pieces, I DID cut it. I made my quilt sandwich and couched some gray hand-spun yarn with bits of silver in it horizontally across the fabric, following the shape of the waves.


I found a piece of hand dyed fabric for her upper body drew her face on with a permanent marker and raw-edge machine appliqued it to the background.


Then I created the tail like I make my fabric mosaics: small pieces of green fabric arranged in the form of a tail and covered with green netting. I made the tail as a separate piece and wrapped the netting around it then appliqued it to the background. I also quilted the scales with a dark green thread.


I couched three different yarn vertically to represent ocean plants and couched white hand-spun yarn also with silver accents as her hair. I gave it a knife-edge binding and couched some thinner white hand-spun yarn around the edge to act as a border.

The final touches were adding some pearl-white buttons.


I only have part of the text on the selvedge and it reads "Haiku styled by Deborah Co" and there it cuts off. So I named my quilt "Mermaid Haiku" and wrote this:

"Peaceful mermaid floats
amid the fish and sea shells
bliss beneath the waves."

More about Mermaid Haiku


=   =   =

 Click on any of the photos to see larger images.

To read more about Project Quilting, go here.

To see other entries for this challenge, visit the My Favorite Fabric link up.

Saturday, February 21, 2015

Falling in Love - Project Quilting


"Falling in Love," 10" x 20", made for Project Quilting, Season 6, Challenge 4: Have a Heart, Feb. 2015 in Yellow Springs, Ohio

Challenge recap for  "Have a Heart":

Your project must include at least 12 hearts of any size or technique.

I found the perfect piece of blue and purple hand-dyed fabric and a picture frame with a mat that had three cut outs. I marked the areas that would show (plus 1/4" buffer).

I laid the fabric on batting (no need for a backing fabric since it would be framed) and did some quick straight line stitching to keep it all together.


I found 12 small hearts cut from felt in the colors of light blue, lavender, dark purple and even one in gray and pinned them so they'd show when matted. I also added some small pieces of netting that had sparkles in it.

I don't usually take photos in progress (I don't want to stop the creative flow) but I knew the hearts would start to get hidden and I wanted to prove that I had all 12 hearts.


I sewed these down then started couching some yarn that was mostly dark purple but had some other colors in it. Then I added some loose threads and other ephemera and covered it with a purple netting and sewed that down, quilting at the same time.

I cut the pieces apart so they were 5" x 7" and taped them to the back of the mat. I didn't have to cut them but I wanted to make sure they laid as flat as possible. I like to use acid-free white artists tape.


Here's a close-up of the top part. The dark purple heart is on the left side, just below the lavender-colored heart, under where two pieces of yarn cross.


Here's the middle section. Again the dark purple heart is hiding under where the yarn crosses at the bottom edge near the middle (left to right).


This is the bottom part and it has the only gray heart.

More about Falling in Love


=   =   =

 Click on any of the photos to see larger images.

To read more about Project Quilting, go here.

To see other entries for this challenge, visit the Have a Heart link up.

Wednesday, February 4, 2015

Persian Shield - Project Quilting

"Persian Shield," 19.5" x 33", made for Project Quilting, Season 6, Challenge 3: UFOs and Orphan Blocks,
Feb. 2015 in Yellow Springs, Ohio

Challenge recap for  "UFOs and Orphan Blocks":

A UFO is an UnFinished Object and an Orphan Block is any block or piece of block that has not yet been put into a project (including cutoff half square triangles). You are encouraged to make something different than you had originally intended.

I thought this was an interesting challenge, but because last year my goal was to finish my UFOs and my Orphans either get absorbed into other quilts or they get filed in the scrap bin by color, I don't have any UFOs and very few Orphans.

When I looked in my "Possible Projects" pile, I did find these:


Sixteen half-ovals, half primarily green and half primarily purple, made up of strip piecing. I got these from another quilter, so they aren't even my Orphans. I'm not even sure what they were left over from, I just liked the color combinations.

I started by piecing one green half-oval with a purple half-oval, although I tried to not have the seam exactly in the center. I spent awhile fussing with the placement of them on the back ground fabric then pin basted everything.


The oval shapes were attached during the quilting process with a squiggle in the middle of each one with varigated purple yarn and also appliqued around the raw edges.

Then I couched a dark multi-color yarn across the middle of the ovals but also extending out to the edges of quilt and I couched a green yarn around the oval shapes themselves. And take it from me, you don't want to just couch the yarn around the outside and hope that also catches the edges of the appliqued shape, you want to applique the shape down first and then couch the yarn on top.

I actually sewed down the pieces and couched them one at a time so I could hide the yarn edges under the piece that overlapped it. For the last piece there wasn't anywhere to hide the tails so I used a needle with a large eye to hide the tail in with the batting.


I used a knife-edge binding/facing technique and the backing fabric even that had leaves on it.


A "Persian Shield" is a plant that has purple-toned leaves. This quilt can also hang horizontally, makes the leaves look even more like shields. If you think the leaves look kind of like footballs, all I can say is that the challenge was posted on Super Bowl Sunday. Come to think of it, they kind of look like UFOs, also.

I also used this backing fabric in the Project Quilting Tree's challenge quilt "Birches" and the dark, multi-colored yarn was used in the Project Quilting Sunrise/Sunset challenge quilt "Sunrise Celebration." 

This is not the first time I've made a quilt from another quilter's Orphan Blocks. In "All the Colors" I used batik half-square triangles that someone gave me.

More about Persian Shield


=   =   =

 Click on any of the photos to see larger images.

To read more about Project Quilting, go here.

To see other entries for this challenge, visit the UFOs and Orphan Blocks link up.

Saturday, January 24, 2015

Sunrise Celebration - Project Quilting

"Sunrise Celebration,"
20" x 31", made for Project Quilting,
Season 6, Challenge 2: Sunrise/Sunset,
Jan. 2015 in Yellow Springs, Ohio

Challenge recap for  "Sunrise/Sunset":

Your inspiration for this challenge is Sunrise/Sunset. Use what inspires you...the colors, the images, the things you do at this time of day.

When I saw that the challenge was Sunrise/Sunset, I knew immediately what fabric I wanted to use. When I purchased the hand-dyed browns and blacks for "Daybreak is Your Midnight", I also made an impulse purchase of some hand-dyed fat eights in a jewel-tone color wheel.

There were 11 different colors so if I made the strips 1" high and only used one color per column, my quilt would only be 11" high. I used a similar pattern that I used in "Daybreak" where I went 1 - 2 - 1 - 2 - 3 - 2 - 3 - 4 - 3 - 4 - 5 - 4 - 5 - 6 - 5 - 6, etc., although the middle column has more rotations of 1 and 2 and less of the blues to make it even out.

I decided that I wanted to do inset piecing on all the 6" stripes like I did on "Daybreak" but I also wanted them to be less subtle so in most cases I used inset pieces from two steps above or below that color.

Originally I was going to have all of the yellow at the bottom, but once I got the strips pieced, I felt that it wasn't working as well as it could, so it was time to improvise. I tried a few different arrangements and decided I liked the yellow on the top on the two outside pieces. Originally I wasn't going to use any sashing but I thought the colors would pop more if they had some black to play against.


I don't have a lot of black fabric in my stash (probably because I use it frequently) and I didn't have enough of the batik blue/black that I like to use, but I did have a black fabric that had little gold stars on it that was also an impulse buy. There was only 1/4 yard but that was just enough to use for the sashing and the binding. The stars made me think of confetti.

It is quilted stitch-in-the-ditch but since I liked the thick hand-quilting that I did on "Daybreak," I used some thin hand-spun maroon yarn and quilted three short stitched in all 90 of the inset pieces. I also couched some commercial chunky yarn along the sashing and around the inside of the binding.

In keeping with the colors and energy on the front, I chose this piece of fabric for the backing.

The colors, confetti stars, and chunky yarn all reminded me of the Sunset Celebration, held nightly in Key West, FL, which is how I got the name.

(In 2019 I had to replace the hand stitches, and you can read about that here.)

More about Sunrise Celebration

= = =

To read more about Project Quilting, go here.

To see other entries for this challenge, visit the Sunrise/Sunset link up.

Saturday, January 10, 2015

Birches - Project Quilting

"Birches," 23" x 18", made for Project Quilting, Season 6, Challenge 1: Trees, Jan. 2015 in Yellow Springs, Ohio

Challenge recap for  "Trees":

Your inspiration for this challenge is trees. Your project does NOT need to include a tree (but certainly can).

When I saw that the challenge was “Trees,” I immediately thought of the dozen or so quilts that I’ve made featuring tree, including three that have been for Project Quilting challenges. My first instinct was to go with a pine tree, perhaps because my Christmas decorations haven’t been put away yet, but when I looked back on the three quilts that I’ve made, half of them have been of pine trees.

So instead I decided to do my usual brain storming while looking through my fabric stash to see if the fabrics would speak to me. That’s when I found this batik:


This fabric didn't just speak, it screamed "Birch Trees." So I continued to look for fabrics that I could use for the background. I chose a navy blue batik with small green dots and a deep green batik for the lower part.

I cut the birch fabric 2" wide, trying to avoid the parts that looked like tree trunks, then I folded the fabric the raw edges in on itself but I didn't try to keep it even or straight so they'd have more of an organic feel. One reason I did this was because I wanted to have two layers of fabric so the seams wouldn't show through when placed on top of the darker fabric. I also didn't want to have raw edges. I did put 1/4" fusible tape along these edges.


Next I made the quilt sandwich and quilted the edges of the trees. I knew I wanted to have heavy quilting on the background fabric to make the trees seem to pop off of the quilt, but I wasn't sure how I wanted to quilt it, so I decided to sleep on it.

The next day I had a quilting idea, which I thought was called "Matchstick Quilting" so I Googled it. It wasn't what I thought it was, but it did spark some ideas. Matchstick Quilting is usually done in straight lines 1/8" apart, and sometimes with different threads. It looks pretty cool on solid color fabric because it changes the color when looking from a distance.


Instead of just straight lines, I decided to echo the shape of the birch trees. I also decided I only wanted to do 1/4" apart instead of 1/8" because it would take half the amount of time and I didn't want to obscure the beauty of the batik fabrics. I did decided to use different colored threads, although I stayed in the same color family of the fabric. I used three shades of dark blue and one dark green.

I used a knife-edge binding technique so the lines of the trees wouldn't be interrupted.

More about Birches

= = =

Click on any of the photos to see larger images.

To read more about Project Quilting, go here.

To see other entries for this challenge, visit the Trees challenge link up.

Thursday, January 1, 2015

Project Quilting Season 6 Begins

 Collage of my Project Quilting Challenge quilts.

For the last four years I've participated in "Project Quilting," a non-competitive on-line quilting contest. I've made 26 quilts for Project Quilting challenges and have sold almost 75% of them! "Early Morning Nine Patch" won "Best of Show" at the Annual Juried Landscape Competition, "The View" at the Rosewood Arts Centre Gallery in 2012. To say that Project Quilting has been successful for me would be an understatement.

It's time for Project Quilting's sixth season. Aside for creating fabulous (an occasionally award-winning) quilts, there is an opportunity to win fabulous prizes. Prizes are chosen at random from all of the participants for that challenge. At the end of the season there will be grand prizes awarded to all participants, with one entry per challenge quilt, so the more challenges you enter, the better your chances for winning.

The schedule for 2015 is:
Challenge 1: January 4
Challenge 2: January 18
Challenge 3: February 1
Challenge 4: February 15
Challenge 5: March 1
Challenge 6: March 15

Each challenge is posted at noon CDT and due exactly one week later at noon CDT.

The challenge will be posted on the "Persimon Dreams" Project Quilting blog and you can also find links about past seasons there.