Sunday, December 30, 2012

Custom Quilts made in 2012

Lots of pictures in this post (click on the photos to see larger views).

"Red, Red Rose," 60" x 36"; cotton, velvet, and satin fabrics.

"Grandma’s Hankies," 58" x 70"; handkerchiefs, table cloth border

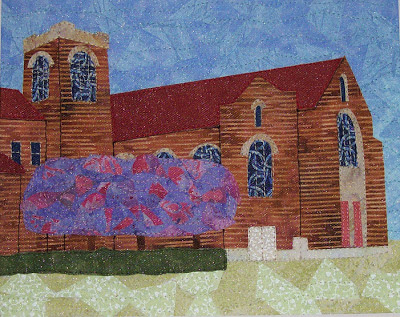
Wilmington United Methodist Church Fabric Mosaic, 11" x 14" framed

Miami Valley School Fabric Mosaics, 11" x 14" framed


Johnny B. Goode T-shirt Quilt, 48" x 80"
 
Theta Chi T-shirt Quilt, 46" x 73"
 
Heavy Metal T-shirt Quilt, 47" x 86"

Monday, December 24, 2012

Happy Holidays!

"Scrappy Christmas Pinwheel," 43" x 43", September 2012

Wishing you a holiday season that is warm and bright!

Sunday, December 9, 2012

Project Quilting Off Season Challenge: Happy Holidays


Left: Advent Calendar, 17" x 35", tree and ornaments made circa 1994, the rest made December 2012 

The new season of Project Quilting starts up again in January. To help get us ready for it, Kim of Persimon Dreams posted an off-season challenge:

Quick recap of the challenge: "Happy Holidays" 1. Select a  December or January holiday. 2. Use two different methods of quilting.

When I was a child we had an Advent Calendar. When I was first married, and before I learned to sew or quilt, my husband and I made an Advent Calendar for ourselves based on the one I had as a child. 

I still love the felt ornaments that we made but I thought the burlap background was a little saggy and now that I was a quilter, I really wanted to make it into a quilted piece.

Left: Advent Calendar before

First I removed the felt tree from burlap background because I didn’t want to hand sew the snaps on again.

Then I removed the silver sequin "tinsel" on the tree. I'd forgotten that the tree was made of two pieces of felt, split along the tinsel line.

Next I pinned the tree to the new background then couched some funky thread on the tree. I picked the thread because I liked the variegated colors and I thought the loops resembled Christmas lights. 

I couched the thread before appliqueing the tree to the background so I could tuck the loose ends of the thread under the tree. Because the tree was made of felt and it won’t fray, I didn’t have to turn the edges under.

Detail of ornaments in the pockets

For the pockets I cut 4 strips 12.5” x 3”. I folded the strips lengthwise so they were 12.5” x 1.5”. I sewed them to a piece of 10.5” x 12.5” plain backing fabric then flipped them up so the folded line was the top of the pocket and the seam allowance was now inside the pocket. I folded the edges under and appliquéd the plain background to the new background.

Because this challenge had to include a second method of quilting, I pieced some green fabric with small black stars to the top and bottom of the background.

Detail of ornaments on the tree 

I basted the quilt top to the backing fabric and the batting. I echo quilted around the tree and quilted vertically on the calendar part to create the individual pockets. While quilting I also couched a funky green thread around the calendar part.

I finished with the same green fabric for the binding then moved the felt ornaments into their new pockets.

To see the other entries go to the Happy Holidays page.

Friday, December 7, 2012

Blue Ribbon Quilt


Blue Ribbon Quilt, 41" x 46", Nov. 2012

This quilt is made using ribbons that Hannah won at horse show competitions. She gave me over 150 ribbons but luckily I didn't have to use them all.

The most difficult part was dealing with the bulk. It was tricky arranging the ribbons temporarily to take photos to send to the client so she could approve the layout ideas.

Usually quilt tops are made by placing two pieces of fabric with the good sides together then sewing them together 1/4" from the edge. When you open them, the stitching can't be seen because the fabric folds to form a seam in the back. I didn't think the ribbons would work well being sewn together that way and folded back so once the final design was decided on, I layered the light green background fabric with some batting and the backing fabric then started attaching the ribbons to the top, so the stitching that holds down the ribbons is also the quilting.

Detail of the woven flat ribbons.

I started at the top. I wove the flat ribbons into groups that were 4 ribbons wide and 3 ribbons deep. I held them together temporarily with blue removable tape while I was sewing them down.

 Detail of the ribbons with rosettes.

Next I added the ribbons with rosettes. I started with the purple one in the top center then working on either side of that ribbon, I added the ribbons in descending order, sometimes leaving parts unsewn because the next ribbon needed to be tucked under it. I changed to my regular sewing foot instead of the walking foot normally used for quilting because the regular foot was smaller and allowed me to get closer to the rosettes. 

Once the center ribbons and the horizontal ribbons were in place I switched to my freemotion "hopping" foot which allowed me to zig in and out of the rosettes to make sure they were attached to the quilt.

The long brown and white ribbons, the medium-length green and purple ribbons, the center white ribbon, and the horizontal green ribbons were set aside until I did the ribbons with the medals.

 
Detail of the ribbons with medals.

I tried to do as much as the rosettes before I did the ribbons with the medals because I knew once I started those, the quilt would become more difficult to maneuver. Luckily these ribbons were attached going straight down. 

I sewed the one in the center to get it in the correct place then I moved to the left side and attached the three on the left, then did the long brown rosette and the green one above them. Then I did the three ribbons with medals on the right and the two rosettes above them. Then I finished adding the rest of the ones with medals.


Detail of the variegated thread.

Because of all the bright colored ribbons, I didn't want to have to change the thread color for every ribbon so I decided to use a variegated thread in rainbow colors which went from red to yellow to green to blue. Some of the rosettes were sewn with the variegated thread, while others were sewn down with a neutral thread, somewhat visible in the photo above around the white rosette.

Because of the weight of this quilt, which is 3.5 pounds, the hanging stick has two picture hangers attached to it, one one the left and one on the right side of the stick.

All photos can be viewed at a larger size by clicking on them.

Saturday, December 1, 2012

2012 Holiday Gift Galleries

There are several local galleries that have my art for sale for the holiday season.

 
Village Artisan's 
Winter Wonderland Holiday Gift Shop
Village Artisans is hosting a Winter Wonderland Holiday Gift Shop in their lobby. They are open Mon. through Thurs. from 11 am to 5 pm, Fri. and Sat. from 11 am to 6 pm, and Sun. noon to 5 pm. They will be open later the week before Christmas: Mon. Dec. 17 through Thurs. Dec. 20 they will be open until 7 pm, and Fri., Dec. 21 they will be open until 9 pm.

Village Artisans is located at  100 Corry St. in Yellow Springs, Ohio.

---


Fairborn Art Association's
Holiday Fine Art and Crafts Sale
 
The Fairborn Art Association will hold it's Holiday Fine Art and Crafts Sale on Sat. Dec. 1 from 10 am to 4 pm and Sun. Dec. 2 from 1 to 4 pm, and also Sat. Dec. 8 from 10 am to 4 pm and Sun. Dec. 9 and 12 from 1 to 4 pm.

The Fairborn Art Association Gallery is located at 221 North Central Ave., Fairborn, Ohio (located in the back of the Fairborn Senior Apartments).

---


DVAC's ARTtoBUY
Dayton Visual Arts Center is having their annual "ARTtoBUY" Holiday Gift Gallery. It is open through Dec. 29. The gallery is open Tues. through Sat. from 11 am to 6 pm with the exception of Christmas Day. There will be Artist Demonstrations for First Friday on Friday, Dec. 6 from 5 to 8 p.m.

DVAC is located at 118 N. Jefferson St., in Dayton, Ohio.

---

 
The Fine Art Center at Town & Country's
Holiday Gift Gallery
The Fine Art Center at Town & Country is having their annual Holiday Gift Gallery. They are open Mon.-Sat. from 10 am to 9 pm and Sun. from noon to 5 pm.

The Fine Art Center is located inside Town & Country, 300 E. Stroop Rd. in Kettering, Ohio.

Tuesday, November 20, 2012

Sunday, November 11, 2012

Art & Soul: a NEW art show this Saturday!


There's a NEW juried fine arts and crafts show in Yellow Springs! This show, Art & Soul, features 29 exceptional artists who “put their souls into making art.” The show is this Sat., Nov. 17 from 10 am-5 pm. It will be in the Mills Lawn School Gym, 200 S. Walnut St. in Yellow Springs, just one block from the main drag (Xenia Ave.) There's plenty of free parking in town and also in the lot behind the school.

There is a $3 admission fee, a portion of which will go to the Yellow Springs Schools and the Yellow Springs Police Coat Fund.

This show is replacing the Glen Helen Nature Arts & Crafts show which has been cancelled. That show had been held the weekend before Thanksgiving for the last 20 years.

Fortunately, several of the artists who used to participate in the Glen Helen show will be in the new show, including: potter Dianne Collinson, photographer Sara Gray, bead weaver Rose Lawson, potter Geno Luketic, lampwork bead artist Theresa Mayer, and Barbara Jones who creates beautiful wool hats and jackets.

You can find photos and bios of all the artists participating on the Art & Soul Facebook page (and you don't have to have a Facebook account to view the page...if it asks you to sign up just close that window).

Wednesday, October 31, 2012

Tuesday, October 30, 2012

Book Review: The Giving Quilt, Jennifer Chiaverini


One of the things that I’ve admired about Jennifer Chiaverini’s books are how she can remain true to the Elm Creek Quilts novel series but still have ways to branch out in new directions with new characters. Her latest book The Giving Quilt takes place at Elm Creek Manor with many of our favorite characters present to lead a quilting retreat the week after Thanksgiving.

Instead of workshops covering different quilting techniques, the quilters are all making quilts to donate to Project Linus, a real organization that collects handmade quilts and blankets to distribute to children in need.

The first chapter introduces us to five new characters from different parts of the country who are attending “Quiltsgiving” this year: Pauline, Linnea, Michaela, Jocelyn, and Karen. Then each character gets to tell her story and struggles in her own chapter. The final chapters cover how the characters resolve to deal with these struggles and how the act of quilting and the act of giving help them move forward.

Like all of Jennifer’s books, there are some characters who we’ve seen before. Karen was one of the quilting instructors who applied to teach at Elm Creek in Circle of Quilters. It is also mentioned that Michaela’s mother attended Elm Creek, but I’m not sure if she was a specific character or not.

I recently re-read Jennifer’s historical books (The Sugar Camp Quilt, The Runaway Quilt, The Lost Quilter, and The Union Quilters)  to have a better grasp of how the characters and events relate to each other Because some of those characters names were fresh in my head I noticed a few clues that might develop in future books.

It is mentioned that Linnea’s husband Kevin’s has a distant cousin who mentioned had attended a Nelson family reunion that took place at Elm Creek Manor. Thomas and Dorthea Nelson are characters in the historical books. And Jocelyn, an African-American character, has a family getaway in North Carolina. The description of that place sounds very similar to the place where Johanna, a runaway slave who appears in The Runaway Quilt and whose story is told in The Lost Quilter.

The Giving Quilt is being released today and is available in hardback.

Sunday, October 28, 2012

"Cosmic Connectivity"

"Cosmic Connectivity," 21.5" x 32.5", August 2012

This quilt is made with commercial cotton fabric, hand-dyed cotton fabric, hand-painted lace, hand-dyed sheer fabric, netting, glass beads, and yarn. It is machine pieced, and machine and hand quilted. The yarn is machine couched and the beads are hand-beaded.

This quilt actually began a few years ago. It started with some hand-dyed light blue fabrics with a central fabric mosaic made of small pieces of dark blue fabrics. After several weeks I decided it wasn't working so I put it away to work on other projects. It sat in the back of the closet and in the back of my mind for a few years.

I usually have a pretty good plan for most of my quilts when I start them, but this one eluded me. I recently pulled it out and worked on it one element at a time, not really by planning but by experimenting every step. I also already had the batting and backing material sandwiched, so all the additions from this point on were accomplished via quilting. There isn't a lot of quilting visible from the front of the quilt but trust me, there's a lot of quilting on this quilt.

It was originally square so I tried visually cropping it and decided to cut it down so it was rectangular rather than square. I originally pieced it with some raw seams on the top and now both the left and right sides had a spot where the raw edge acts like a fringe (and that made the binding step a bit tricky).


I played around with the hand-painted lace piece until it found a place that I liked. Originally I wanted it to be a mono-chromatic piece, just the blue, but emphasize the contrast with the dark and light shades, but I decided it needed a pop of color. When in doubt, always go for the color that is opposite on the color wheel. I put small pieces of orange and yellow-orange fabric under the light blue lace and I really liked the effect.


I decided it needed some dark blue in the rest of the quilt so I cut some dark blue "spikes" and appliqued them to the top as raw edge machine applique.

The background still seemed a little dull so I cut up some more of the hand-painted lace and attached 8 of them to the background, with three in the dark blue fabric mosaic part. These also had the orange and yellow fabric beneath them.

I found some light blue yarn the exact same color as the hand-painted lace, but I wasn't sure how to use it. I experimented with many different ideas until I came up with having them connect the lace parts. It literally ties them together. I also decided to couch a dark blue yarn next to the hand-painted light blue sheer fabric that covers the edge where the fabric mosaic sits on the background.


I wanted to do some hand quilting using thick yellow/gold floss. I tried several ideas until I hit upon making circles around the lace parts. A darker floss outside the blue yarn and a lighter color inside the pie-shape left by the blue yarn. (Here's a tip if you end up taking out quilting and want to get rid of the holes left by the needle, spray the area then use and iron to steam the holes closed).

I used my favorite strip-facing binding technique then it was on to embellishing.

I picked out several blue, yellow and gold beads and tried many, many different arrangements and beads. Eventually I decided to echo the circle motif using bugle beads (glass beads that are long and narrow). The lighter blue circles have 10 beads while the darker blue circles are a little smaller and have 8 beads each. I used some washers as a template to get the sizes consistent.

I added some large beads at the center of the lace spirals and many beads in the lace areas.


All that was left was to name it. I had recently seen the movie "Beasts of the Southern Wild" and looking at this quilt made me thing of the line from the movie: "When it all goes quiet behind my eyes, I see everything that made me, flying around in invisible pieces." There was something cosmic about this image, although I imagine it's much darker out in space.

I joked that I would call it "Space Snails" because of the spirals but instead decided to use alliteration (always a favorite fallback of mine) and call it "Cosmic Connectivity." Even when the lace spirals have been separated from the larger lace fabric, they are still connected to each other, even when confronted with obstacles such as the dark blue fabric mosaic.

More about Cosmic Connectivity


Wednesday, October 17, 2012

Yellow Springs Artist Studio Tour: meet my three guest artists


The Yellow Springs Artist Studio Tour is this coming weekend, Sat., Oct. 20 and Sun. Oct. 21, from 10 am-6 pm both days. This is my fifth year participating as a host, and this year I have three guest artists. We have 27 artists at eight locations with seven guest artists who are new this year.

All three of my guests are artists whose work I admire so much that I own art made by all of them. Instead of using the promotional photos that were provided for the brochure, website, and other print material, I'm including photos of the pieces that we have in our house.

Lisa Wolters makes wonderful sculptural clay vessels that incorporate her love of typography and words themselves by pressing messages into slabs vessels that she then decorates with oxides, vibrant underglazes and touches of clear overglaze.


Libby Rudolf paints lovely watercolors inspired by the beauty of natural spaces around the country and she enjoys paint plein-air. I know she has been busy painting new paintings for this weekend.


Guustie Alvarado makes amazing jewelry, beautiful blown and fused glass creations, and bold mosaic wall hangings which often use fused glass and oil paints or cut glass

The tour is a driving tour. Visit the Yellow Springs Artist Studio Tour website for more information about the other hosts and guest artists and to download a tour map. Maps can also be picked up at the Winds Cafe, Young's Dairy, the Yellow Springs Chamber of Commerce, and at the artists studios the days of the tour. All studios will have red balloons and signs.