Showing posts with label Project Quilting 2012. Show all posts

Sunday, March 25, 2012

Zig Zag Twist - Project Quilting

 
“Zig Zag Twist” 22" x 25.5", made for Project Quilting, 
Season 3, Challenge 6: Ziggin’ and a Zaggin’, Mar. 2012

Recap of the challenge: “Ziggin’ and a Zaggin’”
This week’s inspiration is zigzag. Your challenge is to go beyond the basic zigzag quilt

First I looked at other Zig Zag quilts on-line and I found lots of lovely quilts, most with white background. I also looked at how to make a Zig Zag quilt and one person wrote that they are made of half-square triangles, and I remembered that I had several half-square batik triangles left over from another project.


So I got the triangles out and started playing around with a layout idea. At first I thought I’d make a square quilt with three zig zags so I picked out the pink, red, and purple triangles. As an afterthought, I also took out some blue ones.

I tried them on a few different color backgrounds but decided on black. I’ve used batiks and black before and I love the way it makes the color pop. I played around with moving them apart both horizontally and vertically and finally decided to put a thin black line between the colored pieces horizontally.


On a whim I turned the zig zag pieces on an angle…liked that, but I’d want to square it up. I decided to make some fabric mosaics (small pieces of fabric fused to a backing fabric, covered with netting then quilted in place) to use to contain the space the zig zags were in.

I added black fabric to square it up but it needed more so I made wide black borders. I couched a variegated yarn to contain the zig zags and the fabric mosaics.

For the quilting I used black on the color zig zags and fabric mosaic parts, and color fabric on the black zig zags that started at one fabric mosaic and went to another. I finished the quilt with a strip-facing technique for the binding.

More about Zig Zag Twist

= = =
You can click on the photos to see them larger.

To see the other entries go to the Ziggin and a Zaggin page.

Wednesday, March 7, 2012

"Yellow Strings" Journal Cover - Project Quilting

Recap of the challenge: 

"It's Where I Live"

1. Think about where you live. Take as narrow or as wide a view as you like. Your project should be inspired by where you live.

2. The color scheme for your project will be determined by where you live. Take the first letter of your street, your city and your state. No other colors can be added except in the embellishments.


The Color Scheme: My street starts with an "R", my city a "Y" and my state an "O." The obvious choices are Red, Yellow and Orange. I considered digging deeper for other colors but decided to go with the obvious.


If you look at my last three Project Quilting entries, you'll notice that they are primarily green and blue. While I was working on "Early Morning Nine Patch" I was using some of the wonderful hand-dyed fabric I got from DyeCandy when I won Project Quilting last year, and I noticed that I've used a lot of the green and blues but none of the red, orange or yellows.

It's Where I Live: I live in Yellow Springs, Ohio, a small artsy town surrounded by farmland and nature preserves between Dayton and Columbus. The use of "Yellow" in my quilt is an obvious nod to our town.  Our town is named after a ground-fed spring located in Glen Helen Nature Preserve. The spring has a high iron content which looks more orange than it does yellow, so I included more shades of orange than yellow in this project. (In 2010 I made a set of 6 small quilts featuring places in Glen Helen. You can view the blog post about those quilts here.)


Photo by Corrine Bayraktaroglu
We are also home to Antioch College and the Antioch Writers Workshop plus many self supporting artists. I decided my project would be a cover for a blank, unlined journal, like what a writer or artist would use.

Another of the artsy features in our town is that some of the local fiber artists have been "Yarn Bombing" the trees, telephone poles, street signs and basically anything that doesn't move. I wanted to honor these women so I couched some red-orange-yellow variegated yarn to the front of the journal cover.

There is also a lot of other interesting public art in our town.

I've titled this journal cover "Yellow Strings." The cover includes a hard-back, journal/sketchbook with 108 sheets of 65 lb. acid-free, unlined paper. The back of the cover doesn't have yarn on it but shows off the lovely gradation of the colors.


To see the other entries go to the It's Where I Live page.

Sunday, February 26, 2012

Early Morning Nine Patch - Project Quilting

 "Early Morning Nine Patch"  43.5" x 18", made for Project Quilting, 
Season 3, Challenge 4: Barn Quilt, Feb. 2012
Click on the photo to see it larger and with more detail

Quick recap of the challenge: 1. Your inspiration for this week is Barn Quilts.

You might have noticed recently that there have been quilt squares painted on the side of barns. Most of the time you can find maps in certain areas or counties and take a driving tour to see the quilt squares. Greene County, Ohio (where I live) has one. The first tour was in Adams County, Ohio, a 2 hour drive from where I live. You can read about how the first one got started here.

When I saw the challenge for this week, I knew what I wanted to do. I'd recently been thinking I'd like to make a quilt that was wider than tall and I thought a landscape would be nice. Originally I wanted to use thin strips to make the background, blending blue colors to make the sky and green for the field.

I went to my fabric stash and realized that I have very few pieces of fabric that are 44" wide, most of what I have are smaller chunks. Some of the fabrics I really wanted to use were only 10" wide, so I decided to make five sections that were about 9" wide. I didn't want the same fabrics next to each other with the exception of the top and bottom rows and where the land met the sky, so I added some strips to offset the pattern. The strips were 3/4" wide when finished.


I also knew I wanted to add some traditional squares into the background and since I was working with strips, Nine Patches seemed like an obvious choice but I used the same colors that were around them so they'd have a subtle effect. I machine pieced the background then machine quilted in with stitch-in-the-ditch, so the quilting isn't very obvious but quilting 3/4" apart helps the strips lay flat. 

I used my favorite strip-facing technique for the binding then started to make the barn.


I made the barn by paper piecing the quilt square with the front of the barn and then with the side of the barn. I wasn't sure what color to make the barn, red or brown, so I auditioned some fabric. The bright red was too much, the brown was too subtle. The deeper maroon red was looking good then I noticed on the selvage edge of one of the red fabrics that it was titled "Barn." When I say that I let the fabrics tell me what they want to be, it's not usually quite this literal. But it made the decision easier.

I fused the two red pieces to a piece of stabilizer and did some black thread painting to define the planks. Then I folded the edges over and machine appliqued it to the background. I used a piece of brown batik for the roof and appliqued it the same as the barn.

I fused the fences and attached them with raw-edge applique then couched some fun green yarn along the horizon line and in front of the barn to anchor the barn to the landscape and to give the appearance of grass.

A couple of quick pictures uploaded to the Project Quilting Flickr site and I was done just minutes before the deadline. I don't like working that closely to a deadline but was unable to do any sewing yesterday because we went to Athens, Ohio, to see one of my quilts that is in the "OH+5 2012" show at the Dairy Barn. We didn't take the official Athens Quilt Barn driving tour but I did see several of them on the drive.

More about Early Morning Nine Patch

= = =

Click on the photos to see them larger.

To see the other entries, go to the Barn Quilt page.

Saturday, January 28, 2012

My Love is a Pine Tree Art Quilt - Project Quilting

 "My Love is a Pine Tree"  17" x 16", made for Project Quilting, 
Season 3, Challenge 2: Making Music, Jan. 2012

Quick recap of the challenge: "Making Music" 1. Choose a song title for your inspiration.

Because there are so many good songs that evoke wonderful visuals, it was hard to choose one. I ended up using “ThePine Tree” by Johnny Cash and June Carter.


I’ve always been intrigued by how close together pine trees can grow and how sometimes the bottom half of the tree seems to be just trunk without branches.


Most of the background is pieced. The three trees in front have fabric triangles that are raw edge appliqué and yarn that is hand-couched on them.

Usually when I add yarn I like to put it along the seam lines but this time I put just the bottom on the seam line (to make it disappear some) with the angles between the edge and a quilting line. There is a bead where the yarn meets at the top of the trees.


I added some beads in the sky area, a few are clear but most of them are a dark blue because I didn’t want them to stand out much but still provide some sparkle. The moon is a large button with white fun fur thread circling it to represent a lunar halo (the ring around the moon).

The moon makes me smile because it reminds me of a comedy sketch done on The Mighty Boosh, a British show.

More about My Love is a Pine Tree


= = =

Click on any photo to see them larger.

To see the other entries for this challenge visit the Making Music page.

Friday, January 13, 2012

Reflection Refraction Art Quilt - Project Quilting

 "Reflection Refraction"  19" x 23.5", made for Project Quilting, 
Season 3, Challenge 1: Architectural Elements, Jan. 2012

Quick recap of the challenge: "Architectural Elements" 1. Your inspiration will come from architecture. 

The last few years we’ve spent some time traveling and I noticed that I was drawn to interesting architecture. So much that I took several photos of buildings because I thought they’d make interested quilt ideas. So when I saw that the first challenge for this season’s Project Quilting was Architectural Elements, I immediately started looking through the photos I took. We’ve recently been to Atlanta, Knoxville, Louisville, San Francisco, Portland, and places in between.


The building I decided to use for this project is in the Financial District in San Francisco. The building is highlighted by a red box and you can see some of the reflections in the window. 


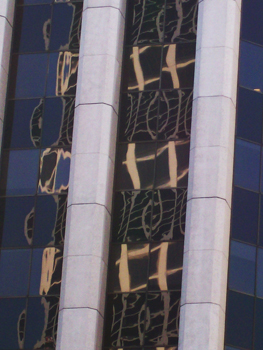
This photo is a close up taken from another angle. I was really interested in how the windows of the building reflected images from the building across the street and it appears that the even-numbered floors are reflection from one angle while the odd-numbered floors are reflecting a different image.

Since the photo is fairly abstract, I wasn’t trying to recreate in exactly. For one thing, there’s not a lot of color in it. And there aren’t any reflections on the far right side. I wanted this quilt to be more symmetrical so I decided to include the reflections on that side also.


To give you an idea of the scale of this quilt, each window is 2.25” high. I decided to create the larger, lighter shapes in the windows by cutting out light-colored fabric and fusing them to the background but I didn’t want to have to do that with the smaller reflections. Instead I looked through my batik fabrics to see if I could find one with a pattern similar to the one in the photo. I found one that I thought was a good fit and it’s green with some blue in it. I also found some other batiks that complimented the green one.


The windows aren’t exactly straight and I wasn’t sure I could piece the subtle angles so I got a piece of fabric and set the batik fabrics on top of it, fusing and stitching to hold them in place. Black bias tape fabric was used to cover the seams.

At first I thought I wanted to do the whitish columns in a light color but once I started to work with the fabric, it didn’t look right to me. I wanted fabric that would be strong enough to support the design element but not stand out too much.  I literally took out every piece of batik fabric to see if it would work and nothing really did. Then I remembered that I had some hand-dyed fabric and found the green piece which did work with the other fabrics.


I pieced the two borders then started quilting. The quilting isn't really visible on the front but it can be seen on the back. I added some black cording on both sides of the green columns then for the binding I used a strip-facing technique.

More about Reflection / Refraction

= = =

Click on the photos to see them larger.

To see the other entries visit the Architectural Elements page.