Saturday, January 26, 2013

Mountain Mist - Project Quilting

"Mountain Mist," 20" x 10" (frame size), made for Project Quilting
Season 4, Challenge 2: My Favorite Color, Jan. 2013

Quick recap of the challenge: "My Favorite Color"
1. Your color scheme will be white and one other color. Use as many shades of that color as you wish, but do not add any other colors to the front of your project, including embellishments.

My favorite color is green. Specifically, sage green.

This project is a fabric mosaic. I arranged several layers of green fabric on a background layer. The top third of the piece has two alternating light green batik fabrics. The middle third has an olive green batik fabric that has a tree line cut across the top of it. And the lower third has a piece of green-blue batik fabric with spots on it.


I separated some off-white wool roving and spread it across the lower part of the middle third to represent fog behind the pine trees in the foreground. These pine trees were cut from two different dark green batik fabrics and have fusible web on the back, which stuck to the roving a little too well, which made them difficult to move afterwards. I couched a piece of yarn across the bottom of the line of pine trees to even them up and give some different texture to that area.

I also used some green wool roving across the lower third and both white and green roving in the upper third, again to give it a whispy effect.


I covered it all with some sparkly green netting then quilting it all together with two different green threads. I cut the mat a little larger so the edges of the piece and the pale green background fabric show, then I framed it in a wood frame.

More about Mountain Mist

= = =

Click on any of the photos to see larger images.

To see other entries for this challenge, visit the My Favorite Color page.

Sunday, January 13, 2013

Winter Quilt Along to Start

Kim, who hosts the Project Quilting, is also hosting a Quilt Along. My Favorite Block Quilt Along starts next Tuesday, Jan 15, and will run during the 'off' week of Project Quilting.

I am one of the block designers and the tutorial for my block will be posted on Thurs. Feb. 14.

There will be a total of 20 different blocks.

Friday, January 11, 2013

Lime Squares - Project Quilting

 "Lime Squares"  12" x 12", made for Project Quilting, 
Season 4, Challenge 1: A Square in a square...in a square..., Jan. 2013

Quick recap of the challenge: "A Square in a square...in a square..."
1. Your inspiration for this challenge is Square in a Square. Interpret it however you’d like. It is an inspiration, not a pattern, so be creative.

25 small 1/2" lime squares are placed slightly angled in (on top of) 25 1-1/4" colored batik squares that are arranged so the colors blended from an orange brown to red to purple to blue to green. Every other colored square is inside a square quilted with white thread.


The squares are quilted through the center in both directions with lime green thread, which attaches them to the background, allowing the corners of the colored squares to float up.


The quilt is 12" square and is wrapped around stretcher bars making it 3/4" deep. Tiny lime green seed beads are sewn where the quilting lines cross on the lime green squares.

More about Lime Squares

= = =

Click on any of the photos to see larger images.

To see other entries for this challenge, visit the A Square in a Square in a Square page.

Saturday, January 5, 2013

Project Quilting Season 4 Begins


It is time for Season 4 of Project Quilting to begin! I've been a part of Project Quilting since the beginning. The first season I was a judge, the second season I was the Grand Prize Winner, last year I was a participant, and this year I'm a participant and a prize sponsor.

My favorite thing about Project Quilting? All the really great quilts that I've made for the challenges, including one that won "Best of Show" in an all-media regional landscape competition.

Like last year there won't be any judges, but there will still be prizes. Prizes will be chosen by random from all of the participants for that challenge.

At the end of the season there will be grand prizes and each time you enter a challenge your name will be put in the drawing for the grand prize. So the more challenges you enter, the better your chances for winning.

The schedule for this year is:
Challenge 1: January 6
Challenge 2: January 20
Challenge 3: February 3
Challenge 4: February 17
Challenge 5: March 3
Challenge 6: March 17

Each challenge is posted at noon CDT and due exactly one week later at noon CDT.

Sunday, December 30, 2012

Custom Quilts made in 2012

Lots of pictures in this post (click on the photos to see larger views).

"Red, Red Rose," 60" x 36"; cotton, velvet, and satin fabrics.

"Grandma’s Hankies," 58" x 70"; handkerchiefs, table cloth border

Wilmington United Methodist Church Fabric Mosaic, 11" x 14" framed

Miami Valley School Fabric Mosaics, 11" x 14" framed


Johnny B. Goode T-shirt Quilt, 48" x 80"
 
Theta Chi T-shirt Quilt, 46" x 73"
 
Heavy Metal T-shirt Quilt, 47" x 86"

Monday, December 24, 2012

Happy Holidays!

"Scrappy Christmas Pinwheel," 43" x 43", September 2012

Wishing you a holiday season that is warm and bright!

Sunday, December 9, 2012

Project Quilting Off Season Challenge: Happy Holidays


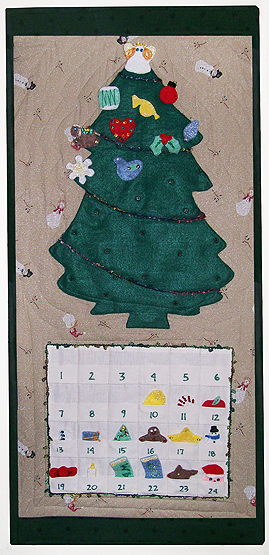
Left: Advent Calendar, 17" x 35", tree and ornaments made circa 1994, the rest made December 2012 

The new season of Project Quilting starts up again in January. To help get us ready for it, Kim of Persimon Dreams posted an off-season challenge:

Quick recap of the challenge: "Happy Holidays" 1. Select a  December or January holiday. 2. Use two different methods of quilting.

When I was a child we had an Advent Calendar. When I was first married, and before I learned to sew or quilt, my husband and I made an Advent Calendar for ourselves based on the one I had as a child. 

I still love the felt ornaments that we made but I thought the burlap background was a little saggy and now that I was a quilter, I really wanted to make it into a quilted piece.

Left: Advent Calendar before

First I removed the felt tree from burlap background because I didn’t want to hand sew the snaps on again.

Then I removed the silver sequin "tinsel" on the tree. I'd forgotten that the tree was made of two pieces of felt, split along the tinsel line.

Next I pinned the tree to the new background then couched some funky thread on the tree. I picked the thread because I liked the variegated colors and I thought the loops resembled Christmas lights. 

I couched the thread before appliqueing the tree to the background so I could tuck the loose ends of the thread under the tree. Because the tree was made of felt and it won’t fray, I didn’t have to turn the edges under.

Detail of ornaments in the pockets

For the pockets I cut 4 strips 12.5” x 3”. I folded the strips lengthwise so they were 12.5” x 1.5”. I sewed them to a piece of 10.5” x 12.5” plain backing fabric then flipped them up so the folded line was the top of the pocket and the seam allowance was now inside the pocket. I folded the edges under and appliquéd the plain background to the new background.

Because this challenge had to include a second method of quilting, I pieced some green fabric with small black stars to the top and bottom of the background.

Detail of ornaments on the tree 

I basted the quilt top to the backing fabric and the batting. I echo quilted around the tree and quilted vertically on the calendar part to create the individual pockets. While quilting I also couched a funky green thread around the calendar part.

I finished with the same green fabric for the binding then moved the felt ornaments into their new pockets.

To see the other entries go to the Happy Holidays page.