Monday, March 28, 2016

Mini Madness: Three 6"x6" mini art quilts

 Left to right: "Poppy Power," "Beach Time," and "Summer Barn," all 6"x6"x1", made by Pam Geisel, March 2016

This month the Island Batik Ambassador's are creating miniature pieces for #MiniMadnessIB Challenge! The guidelines were simple, the finished pieces must be smaller than 24" x 24" and can use any of the fabric that we've received so far. And since this is my second year as an ambassador, I've had three shipments of fabric, so plenty of choices.

Also, Village Artisans, the local artist co-op that I belong to, are having an exhibit of pieces that measure 6" x 6". Voila, two birds, one stone. I came up with some 6" x 6" designs then I pulled out all of my Island Batik fabric and after auditioning it all, I whittled it down to the chose few.

Coincidentally, the fabrics I used came from three different collections, each collection from a different shipment. The "California Creamery" jelly roll pre-cuts came this Spring, the "Sea Salt Sandy" fat quarters (the rainbow colors on the right) came last Fall, and the mini pre-cuts at the bottom, with pieces that were 3" x 10", came last Spring.

While I love all fabric, I really adore pre-cuts. Perhaps it's because you get more fabric choices with them. Each piece is smaller, but I don't tend to use large pieces anyway, and I also have difficulty cutting into larger pieces, unless it's fabric that I bought for a specific project.

The Sea Salt Sandy fabric came as fat quarters. I just love the visual texture in these.

Here's a closer look at the finished pieces:


In "Poppy Power," the blue sky and the bottom three green pieces were from the mini pre-cuts. The top green pieces is a Sea Salt Sandy, as are the three red poppies.


I quilted thread somewhat vertically to represent other flower stems, couched some blue to green variegated yarn for the three flower stems, and added some red seed beads for poppies in the background.

=  =  =


In "Beach Time" the three sand fabrics were from the "California Creamery" jelly roll and the three water fabrics came from the Sea Salt Sandy collections.


I couched some funky, hand-woven cream-colored yarn for the surf, hand sewed a star fish with embroidery thread, and hand-sewed some white seed beads on the beach near the surf.

=  =  =


In "Summer Barn" I revisited the barn from my Early Morning Nine Patch quilt. The background fabrics are the same as in "Poppy Power" (and have now all been used) and the barn sides and roof are from the Sea Salt Sandy collection.


I couched some yarn where the land meets the sky and around the bottom of the barn. I'm note sure if the designers had anything particular in mind when they create these, but they made a wonderful barn and roof, not to mention poppies and beach water.


All three pieces are wrapped around a 6" x 6" frame so they are all just under 1" deep.

More about Poppy Power, Beach Time, and Summer Barn


Saturday, March 19, 2016

Modern Art Postcards - Project Quilting

"Modern Art Postcards," 6" x 4" (each), made for Project Quilting, Season 7, Challenge 6: A Goose in the Monkey Wrench, Mar. 2016 in Yellow Springs, Ohio
Challenge recap for  "A Goose in the Monkey Wrench":  
For this challenge you must include at least one monkey wrench block and one flying geese block.  You may add other blocks if you wish.
I decided to make two postcards for this challenge, for two reasons. One is I've been working on a bed-sized custom quilt and that took most of my time. 
The second reason is since there two traditional quilt blocks were part of the Project Quilting Focus Through The Prism challenges, I thought it would be appropriate to use the same fabric we used for those challenges, and I mostly have small pieces of that fabric left.
Both postcards are 6" x 4" and had white fabric on the back where you can write a message and the address. And you can actually send these through the mail as they are! All of the edges are sewn down and are finished with a satin stitch using black thread.

Click on any of the photos to see larger images.

To read more about Project Quilting, go here.

To see other entries for this challenge, visit the A Goose in the Monkey Wrench link up.

Sunday, March 6, 2016

Island Batik Fabric Winner!


And the winner of these two half yard cuts of the Island Batik Desert Rose fabrics from the Island Batik Ambassador Planes, Trains, and Automobiles Blog Hop is...


And #14 is...Wanda S Hanson! You can check out her blogs Exuberant Color to see what she makes with these lovely fabrics!


Thursday, February 25, 2016

Lavender Mountains: Planes, Trains & Automobiles Blog Hop!

"Lavender Mountains," 25" x 31", made by Pam Geisel, Jan 2016

Welcome to today's stop on the Island Batik Ambassador's "Planes, Trains & Automobiles" Blog Hop!

Today I'll share a quilted project made with brand new Island Batik fabric line "Desert Rose" and how you can enter a giveaway to win some Island Batik fabric of your own. (You can click on any photo to see it larger).

All of the Island Batik fabric that I used are available now. To find a location near you, visit the Island Batik Store Locator.


To make this art quilt I used four purples and two pinks from the Desert Rose Collection:


And for the sun I used 121500343 from the Sea Salt-Sandy Collection.


The theme of this blog hop is "Planes, Trains & Automobiles" and back in 1996 my husband and I took the Empire Builder Amtrak train from Chicago to Seattle, with stopovers in Montana. One of my memories from that trip is when we were moving west as the sun was setting, it seemed to take a very long time to set. (And when we came back east it was over very quickly). The fabrics that I received from the Desert Rose Collection were the right colors to make a sunset quilt with.

I don't have photos of the sunset from that trip so I searched for images of sunsets in the mountains. There were several from the Blue Ridge Mountains that were wonderful examples of “Aerial Perspective,” which is how atmospheric conditions influence our perception of objects in the distance. As objects get further away, they appear lighter in tone, which is why the “mountains” in the background are lighter in color that the “mountains” in the foreground. Since I had four wonderful shades of purple to use and pink for the sky, I decided this would be my quilt for the blog hop.


Step 1 : Cut the fabrics at angles to represent mountains being careful to not cut straight lines. Leave about half an inch fabric for overlap, baste them to the batting and backing, then quilted along the fabric edges to keep them down. 


Step 2 : Use a variegated purple thread to do free motion stippling on the four purple mountains (more obvious on the darker and lighter purples) and couched a fun yarn at the edges of the purple fabrics.


Step 3 : Add the yellow fabric (taken from the Sea Salt-Sandy Collection). Couch some bumpy yellow yarn around the sun and added the clouds. 

Step 4 : For the clouds cut long, free-form oval shapes from the darker pink fabric, the lighter two purples, and from a sheer pink fabric. Quilted all of these down with a pink thread using curving lines going back and forth to catch the edges of the fabrics.

More about Lavender Mountains


http://www.islandbatik.com/


Friday, February 19, 2016

African Safari Baby Quilt - Project Quilting

"African Safari" Baby Quilt, 29 x 33.5", made for Project Quilting, Season 7, Challenge 4: I Need a Vacation, Feb. 2016 in Yellow Springs, Ohio

Challenge recap for  "I Need a Vacation":
 
Vacation is the inspiration for this challenge. Use the way vacation makes you feel or the places you'd go or the transportation to get there. Anything vacation related that inspires you.


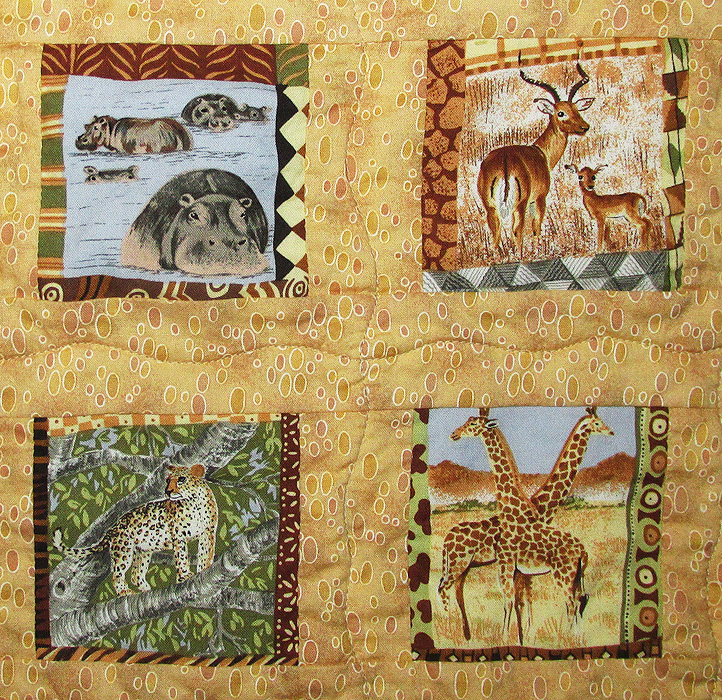
For my project, we're going on an African Safari. I actually have a small box of fabrics with safari animals printed on them. They are mostly small pieces, not a lot of yardage which is why it's a small box. There were 30 of these small animal prints that measured about 3" x 3". They have little printed quilt patterns on them.

I pieced them with a tan fabric with oval spots on it so that each animal box is separated by sashing. And I added a brown border then machine quilted wavy lines in the sashing.


The backing fabric is one print that has small safari animals floating on a brown background and larger ones in a row across the bottom.

= = =

Click on any of the photos to see larger images.

To read more about Project Quilting, go here.

To see other entries for this challenge, visit the I Need a Vacation link up.

Friday, February 12, 2016

Blog Hop: Island Batik Ambassador's "Planes, Trains, & Automobiles" Kick Off


The Island Batik Ambassador's are hosting a blog hop. Each day over the next couple of weeks, we’ll feature a new fabric collection and link to at least one Ambassador blog to see what she made with these wonderful fabrics. Be sure to follow along every day as we have lots of goodies to give away!

Here’s the schedule:

M 2/15 – Caribbean Splash
Bejeweled Quilts
Pamela Quilts

Tu 2/16 – London Fog
Moose Stash Quilting

W 2/17 – French Roasted
KISSed Quilts
Made In Scraps
Happy Cottage Quilter

Th 2/18 – Crystal Cove
Freemotion by the River

F 2/19 – Florida Oranges
Fun Threads Designs
Kauffman Designs
Tamarinis

M 2/22 – Coral Reef
Mary Mack Made Mine
Purrfect Spots Designs

Tu 2/23 – Sweet Georgia Peach
One Quilting Circle
KISSed Quilts

W 2/24 – Hollywood Hills
The Fit Quilter
Maria Michaels Designs

Th 2/25 – Desert Rose
Me!
Lemon Tree Snippets

F 2/26 – Sea Salt Sandy
Tamarinis
KISSed Quilts
Moose Stash Quilting
Pamela Quilts
Bejeweled Quilts

M 2/29 – Jersey Shore
Beaquilter
Lemon Tree Snippets

Tu 3/1 – Tuscany Sun
Tammy Silvers

W 3/2 – Lavish
Freemotion by the River
Moose Stash Quilting

Th 3/3 – Fire Island
KISSed Quilts

F 3/4 – Tinsel, Holiday Happenings
Purrfect Spots Designs
KISSed Quilts
Moose Stash Quilting

http://www.islandbatik.com/

Sunday, February 7, 2016

String Theory - Project Quilting

"String Theory," 16 x 16,made for Project Quilting, Season 7, Challenge 3: All About That Thread, Feb. 2016 in Yellow Springs, Ohio

Challenge recap for  "All About That Thread":
 
In honor of one of Project Quilting's long term sponsors, Aurifil, the inspiration for this week's challenge is THREAD.
Thread is obviously important for quilting. You use it for piecing and appliqueing a quilt top. You use it for the quilting. Plus adding the binding, sleeves and labels. Other than the quilting, it's usually not even visible.
I had a ton of ideas for making a quilt that features thread:
  • Making a whole quilt, which doesn't have any piecing or applique on the top and is just quilting. While these are lovely, I don't think my quilting skills (or patience) are up for this. 
  • Doing thread painting, where you use the sewing machine to apply stitches almost as if it's paint. I've done some of this before but haven't really enjoyed the process. It works well for feathers so I was thinking of making an owl or a rooster.
  • Making something like Ana Teresa Barboza's embroidery work where the thread hangs outside of the frame of the image. Not sure how this is even done, and somehow I don't think what I'd make would look like this.
  • The thread art where you wrap thread around nails in a board to create a design. But how to do this on fabric?
Wednesday evening I finally decided that I wanted to do something like the thread art, but using buttons with a shank (instead of holes on top) and wrapping thread around them. In order to do this, I needed some buttons so as I was driving to the store, the whole layout popped into my head.

The store only had 3 packs of cardigan buttons so I bought all three. Having a total of 30 buttons meant I could have 15 buttons on each side. If each button is 1" apart and we allow for room at the top and bottom, my piece would be 16" x 16".


I found a lovely piece of black marbled fabric and another that was a black on black tone and pieced them along with a multi-colored batik strip. I didn't want the batik strip going all the way to the edges so I pieced some black fabric on either side of it.

I made the quilt sandwich using some black batting. I haven't used it before and sometimes found I wasn't sure where the edge of the quilt top was when I was quilting. I quilted some random lines on angles.

I bound the quilt then used a white colored pencil to mark where the buttons will go, then added the buttons.


Instead of thread I used embroider floss in the colors of the batik strip. Instead of wrapping the thread around the buttons, I threaded the floss and went through the hole in the button shanks.


Unlike the thread art with the nails in the wood, this wasn't stiff. After I was finished I cut open the backing behind the thread and added a piece of thick fusible interfacing. If I did this again, I'd add that part during the sandwiching process.

The last thing I did was couch a piece of variegated yarn just inside the binding.

More about Sting Theory


= = =

Click on any of the photos to see larger images.

To read more about Project Quilting, go here.

To see other entries for this challenge, visit the All About That Thread link up.