Sunday, February 26, 2012

Early Morning Nine Patch - Project Quilting

 "Early Morning Nine Patch"  43.5" x 18", made for Project Quilting, 
Season 3, Challenge 4: Barn Quilt, Feb. 2012
Click on the photo to see it larger and with more detail

Quick recap of the challenge: 1. Your inspiration for this week is Barn Quilts.

You might have noticed recently that there have been quilt squares painted on the side of barns. Most of the time you can find maps in certain areas or counties and take a driving tour to see the quilt squares. Greene County, Ohio (where I live) has one. The first tour was in Adams County, Ohio, a 2 hour drive from where I live. You can read about how the first one got started here.

When I saw the challenge for this week, I knew what I wanted to do. I'd recently been thinking I'd like to make a quilt that was wider than tall and I thought a landscape would be nice. Originally I wanted to use thin strips to make the background, blending blue colors to make the sky and green for the field.

I went to my fabric stash and realized that I have very few pieces of fabric that are 44" wide, most of what I have are smaller chunks. Some of the fabrics I really wanted to use were only 10" wide, so I decided to make five sections that were about 9" wide. I didn't want the same fabrics next to each other with the exception of the top and bottom rows and where the land met the sky, so I added some strips to offset the pattern. The strips were 3/4" wide when finished.


I also knew I wanted to add some traditional squares into the background and since I was working with strips, Nine Patches seemed like an obvious choice but I used the same colors that were around them so they'd have a subtle effect. I machine pieced the background then machine quilted in with stitch-in-the-ditch, so the quilting isn't very obvious but quilting 3/4" apart helps the strips lay flat. 

I used my favorite strip-facing technique for the binding then started to make the barn.


I made the barn by paper piecing the quilt square with the front of the barn and then with the side of the barn. I wasn't sure what color to make the barn, red or brown, so I auditioned some fabric. The bright red was too much, the brown was too subtle. The deeper maroon red was looking good then I noticed on the selvage edge of one of the red fabrics that it was titled "Barn." When I say that I let the fabrics tell me what they want to be, it's not usually quite this literal. But it made the decision easier.

I fused the two red pieces to a piece of stabilizer and did some black thread painting to define the planks. Then I folded the edges over and machine appliqued it to the background. I used a piece of brown batik for the roof and appliqued it the same as the barn.

I fused the fences and attached them with raw-edge applique then couched some fun green yarn along the horizon line and in front of the barn to anchor the barn to the landscape and to give the appearance of grass.

A couple of quick pictures uploaded to the Project Quilting Flickr site and I was done just minutes before the deadline. I don't like working that closely to a deadline but was unable to do any sewing yesterday because we went to Athens, Ohio, to see one of my quilts that is in the "OH+5 2012" show at the Dairy Barn. We didn't take the official Athens Quilt Barn driving tour but I did see several of them on the drive.

More about Early Morning Nine Patch

= = =

Click on the photos to see them larger.

To see the other entries, go to the Barn Quilt page.

Tuesday, February 21, 2012

Book Review: Sonoma Rose by Jennifer Chiaverini

As a quilter, I enjoy reading novels about quilters and quilt themes. I’ve been reading Jennifer Chiaverini’s Elm Creek Quilts novels since The Quilter’s Apprentice first came out in 2000. When Round Robin, the second book in the series came out, I decided that Jennifer was a genius. She’d set up the premise of a quilter’s retreat in the first book but would be able to write books that followed the people who attended the retreat, have her characters move to different locations, and sometimes the narrative follows a quilt as it travels across the country.

Several of the books are set in the past, featuring relatives of the main character and sometimes specific quilts that were made in the historical books but still around in the contemporary books.

Jennifer’s latest book Sonoma Rose is set in southern California in the 1920s, specifically in wine country during Prohibition. The Elm Creek connection is that the main character, Rosa Barclay, is an acquaintance of Elizabeth Nelson, the favorite aunt of Sylvia Compson, the main characters and master quilter in the series. Elizabeth’s story is told in The Quilter’s Homecoming. While reading Sonoma Rose I really wanted to re-read The Quilter’s Homecoming to see how the stories cross over.

While I enjoy the contemporary Elm Creek novels, I like reading the historical books because they offer me a glimpse into what life was like in another place during another time and I often find myself learning new things.

There isn’t a lot about quilting in Sonoma Rose but in some ways there are some quilts that are a catalyst for what occurs in the book.

While there are the usual themes expected in a book set during prohibition such as bootlegging and mobsters, there are several contemporary themes including abusive spouses, Celiac disease, and alcoholism. I found the characters were complex and well developed and once I finished the book I found that the characters stayed in my head.

Sonoma Rose is being released today and is available in hardback.

Saturday, February 4, 2012

The Heart is Color-Blind Fabric Mosaic


This framed mini quilt was made for the Village Artisan's "Mysteries of the Heart" exhibit. Each artist was encouraged to finish this sentence:

"The Heart is ____________________ ."


I decided to go with the sentence" "The Heart is Color-Blind" so hand cut 44 pink and 100 green fabric circles and arranged them like a color-blind test only instead of a number in a circle, it's a heart in a circle.


The circles were fused to a white background and the white background was quilted with white thread. I didn't quilt the circles because I didn't want to add any additional texture to that part of the quilt. The quilt is framed in a wood frame (outside dimensions are 10.5" x 10.5".


The exhibit at Village Artisans runs through February 24. There will be an artist reception on Fri., Feb. 10 from 6-9 pm.  Village Artisans is located at 100 Corry St. in Yellow Springs and is open Mon.-Thurs. 11 am- 6 pm, Fri.-Sat., 11 am-7 pm and Sun. noon-6 pm.

Saturday, January 28, 2012

My Love is a Pine Tree Art Quilt - Project Quilting

 "My Love is a Pine Tree"  17" x 16", made for Project Quilting, 
Season 3, Challenge 2: Making Music, Jan. 2012

Quick recap of the challenge: "Making Music" 1. Choose a song title for your inspiration.

Because there are so many good songs that evoke wonderful visuals, it was hard to choose one. I ended up using “ThePine Tree” by Johnny Cash and June Carter.


I’ve always been intrigued by how close together pine trees can grow and how sometimes the bottom half of the tree seems to be just trunk without branches.


Most of the background is pieced. The three trees in front have fabric triangles that are raw edge appliqué and yarn that is hand-couched on them.

Usually when I add yarn I like to put it along the seam lines but this time I put just the bottom on the seam line (to make it disappear some) with the angles between the edge and a quilting line. There is a bead where the yarn meets at the top of the trees.


I added some beads in the sky area, a few are clear but most of them are a dark blue because I didn’t want them to stand out much but still provide some sparkle. The moon is a large button with white fun fur thread circling it to represent a lunar halo (the ring around the moon).

The moon makes me smile because it reminds me of a comedy sketch done on The Mighty Boosh, a British show.

More about My Love is a Pine Tree


= = =

Click on any photo to see them larger.

To see the other entries for this challenge visit the Making Music page.

Friday, January 13, 2012

Reflection Refraction Art Quilt - Project Quilting

 "Reflection Refraction"  19" x 23.5", made for Project Quilting, 
Season 3, Challenge 1: Architectural Elements, Jan. 2012

Quick recap of the challenge: "Architectural Elements" 1. Your inspiration will come from architecture. 

The last few years we’ve spent some time traveling and I noticed that I was drawn to interesting architecture. So much that I took several photos of buildings because I thought they’d make interested quilt ideas. So when I saw that the first challenge for this season’s Project Quilting was Architectural Elements, I immediately started looking through the photos I took. We’ve recently been to Atlanta, Knoxville, Louisville, San Francisco, Portland, and places in between.


The building I decided to use for this project is in the Financial District in San Francisco. The building is highlighted by a red box and you can see some of the reflections in the window. 


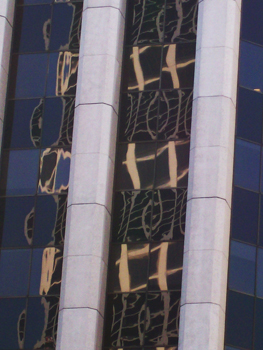
This photo is a close up taken from another angle. I was really interested in how the windows of the building reflected images from the building across the street and it appears that the even-numbered floors are reflection from one angle while the odd-numbered floors are reflecting a different image.

Since the photo is fairly abstract, I wasn’t trying to recreate in exactly. For one thing, there’s not a lot of color in it. And there aren’t any reflections on the far right side. I wanted this quilt to be more symmetrical so I decided to include the reflections on that side also.


To give you an idea of the scale of this quilt, each window is 2.25” high. I decided to create the larger, lighter shapes in the windows by cutting out light-colored fabric and fusing them to the background but I didn’t want to have to do that with the smaller reflections. Instead I looked through my batik fabrics to see if I could find one with a pattern similar to the one in the photo. I found one that I thought was a good fit and it’s green with some blue in it. I also found some other batiks that complimented the green one.


The windows aren’t exactly straight and I wasn’t sure I could piece the subtle angles so I got a piece of fabric and set the batik fabrics on top of it, fusing and stitching to hold them in place. Black bias tape fabric was used to cover the seams.

At first I thought I wanted to do the whitish columns in a light color but once I started to work with the fabric, it didn’t look right to me. I wanted fabric that would be strong enough to support the design element but not stand out too much.  I literally took out every piece of batik fabric to see if it would work and nothing really did. Then I remembered that I had some hand-dyed fabric and found the green piece which did work with the other fabrics.


I pieced the two borders then started quilting. The quilting isn't really visible on the front but it can be seen on the back. I added some black cording on both sides of the green columns then for the binding I used a strip-facing technique.

More about Reflection / Refraction

= = =

Click on the photos to see them larger.

To see the other entries visit the Architectural Elements page.

Saturday, January 7, 2012

Glen Helen Members Show

 "Three Trees" side view, 12" x 12"
  
My art quilt "Three Trees" plus two of my fabric mosaics are in the Glen Helen Association Members' 6th Annual Art Exhibition will be in the Glen Building Atrium Gallery, 405 Corry St. in Yellow Springs. This show goes through Feb. 28 and the building is open Mon.-Fri. from 9:30 am to 4:30 pm and Sat.-Sun. from 10 am to 4 pm.

The opening reception is this Sun., Jan. 8 from 2-4 pm.

Tuesday, January 3, 2012

Project Quilting Season 3 Begins

It is time for Season 3 of Project Quilting to begin. Last year I was the Grand Prize Winner.

This year will be a little different. There will be no judges but there will still be prizes. Prizes will be chosen by random from all of the participants for that challenge.

At the end of the season there will be grand prizes and each time you enter a challenge your name will be put in the drawing for the grand prize. So the more challenges you enter, the better your chances for winning.

The schedule for this year is:
Challenge 1: January 8
Challenge 2: January 22
Challenge 3: February 5
Challenge 4: February 19
Challenge 5: March 4
Challenge 6: March 18

Each challenge is posted at noon CDT and due exactly one week later at noon CDT.